Wowza 4.8.x – Ubuntu 18.04 – Letsencrypt

Update june 19, 2023: I have created an update series for Letsencrypt. Please follow the new tutorial.
https://vanmarion.nl/blog/blog/letsencrypt-ssl-for-wowza-frontend-backend/
I had many questions in my previous topic about the ssl configuration in Ubuntu or CentOS. So i decided to update this, create new installers and see if the configuration of SSL has changed. And indeed it had. I prefer Ubuntu myself, but i use CentOS as well. It’s up to you which OS you want to use.
This second post will be the configuration of LetsEncrypt on Ubuntu 18.04 LTS
See this page: Wowza 4.8.x CentOS 7 Letsencrypt for the CentOS version
Feel free to place a comment (comments will be approved first, to avoid spam).
If you need a clean install of Wowza Streaming Engine on Ubuntu 18.04 LTS then checkout the installer scripts: https://github.com/nlmaca/Wowza_Installers which i have created Those includes Firewall (CSF), Java 11 and Wowza installation. All you need is a valid license key or developer key.
Requirements
- Ubuntu 18.04 LTS server installed
- Wowza 4.8.x installed
- Firewall open ports: 8088, 8090, 443, 80, 1935
- a domainname pointing to your wowza server (we need this for SSL activation)
What will i show you:
- Installation of letsencrypt on Ubuntu Server
- SSL converter to JKS file
- configuration of frontend (playback) and backend (enginemanager) over SSL
- Testing of playback url’s (vlc, jwplayer)
Keep in mind:
- Your server might have an increase of virtual memory because of the ssl encryption in your stream(s).
- Always test this in your test environment. Don’t keep me responsible for it. This is a guide as is.
Start of installation
Open an ssh connection to your Server and run scripts as root
# update your server
apt-get update && apt-get upgrade -y
apt-get install git

# clone the certbot repository and configure certbot
git clone https://github.com/certbot/certbot /opt/letsencrypt
cd /opt/letsencrypt

# create an SSL certificate. change SUB.DOMAIN.EXT to the domain that points to your server
sudo -H ./letsencrypt-auto certonly --standalone -d SUB.DOMAIN.EXT --key-type rsa

# Some questions will be asked. Fill them in accordingly
# Answer some of the questions:
```
enter email: set-your-email
agree TOS(Terms of Service): A
Share your email: (up to you): N
Set 2 cronjobs so the ssl certificate will be updated automaticly
# crontab -e
@weekly root cd /opt/letsencrypt && git pull >> /var/log/letsencrypt/letsencrypt-auto-update.log
@monthly root /opt/letsencrypt/letsencrypt-auto certonly --quiet --standalone --renew-by-default -d SUB.DOMAIN.EXT >> /var/log/letsencrypt/letsencrypt-auto-update.log
Wowza needs an JKS file. So we need to convert our just created ssl certificate to a JKS file. On the github page of robymus you can find the script. We will use version 0.1
*Minor update april 6 2021. replaced the 0.1 version with 0.2. The procedure hasn’t changed
# Go to the wowza directory
cd /usr/local/WowzaStreamingEngine/lib

# Download the jar file in the lib directory
wget https://github.com/robymus/wowza-letsencrypt-converter/releases/download/v0.2/wowza-letsencrypt-converter-0.2.jar

# Create a jks file
java -jar wowza-letsencrypt-converter-0.2.jar -v /usr/local/WowzaStreamingEngine/conf/ /etc/letsencrypt/live/

# This file will be created in the /usr/local/WowzaStreamingEngine/conf/ directory (jksmap.txt and the jks file).
We now need the contents of the jksmap.txt (copy them to a temporary notepad).
cat /usr/local/WowzaStreamingEngine/conf/jksmap.txt

# This will show you something like this: SUB.DOMAIN.EXT={"keyStorePath":"/usr/local/WowzaStreamingEngine/conf/SUB.DOMAIN.EXT.jks", "keyStorePassword":"secret", "keyStoreType":"JKS"}
Now we need to enable 443 in the VHost.xml file
cd /usr/local/WowzaStreamingEngine/conf

vi VHost.xml
You will see that the 443 is in comment tags <!– and –> at the end of the HostPort. Remove those tags. Second is that we have to change the KeyStorePath and KeyStorePassword in this part
Before:
<SSLConfig>
    <KeyStorePath>${com.wowza.wms.context.VHostConfigHome}/conf/keystore.jks</KeyStorePath>
    <KeyStorePassword>[password]</KeyStorePassword>
    <KeyStoreType>JKS</KeyStoreType>
    <DomainToKeyStoreMapPath></DomainToKeyStoreMapPath>
    <SSLProtocol>TLS</SSLProtocol>
    <Algorithm>SunX509</Algorithm>
    <CipherSuites></CipherSuites>
    <Protocols></Protocols>
    <AllowHttp2>false</AllowHttp2>
</SSLConfig>
And after we have changed the settings. Also make sure to change SUB.DOMAIN.EXT to your own domainname.
<SSLConfig>
    <KeyStorePath>${com.wowza.wms.context.VHostConfigHome}/conf/SUB.DOMAIN.EXT.jks</KeyStorePath>
    <KeyStorePassword>secret</KeyStorePassword>
    <KeyStoreType>JKS</KeyStoreType>
    <DomainToKeyStoreMapPath></DomainToKeyStoreMapPath>
    <SSLProtocol>TLS</SSLProtocol>
    <Algorithm>SunX509</Algorithm>
    <CipherSuites></CipherSuites>
    <Protocols></Protocols>
    <AllowHttp2>false</AllowHttp2>
</SSLConfig>
Save the file after you have made the changes.
The last thing before restarting is to change the tomcat properties
vi /usr/local/WowzaStreamingEngine/manager/conf/tomcat.properties

#Change the default values

#httpsPort=8090
#httpsKeyStore=conf/certificate.jks
#httpsKeyStorePassword=[password]
#httpsKeyAlias=[key-alias]

# TO:

httpsPort=8090
httpsKeyStore=/usr/local/WowzaStreamingEngine/conf/SUB.DOMAIN.EXT.jks
httpsKeyStorePassword=secret
#httpsKeyAlias=[key-alias]
Now we will restart Wowza
service WowzaStreamingEngineManager restart
service WowzaStreamingEngine restart
The configuration is almost done.
Open your browser and instead of using the http://wowza-server:8088/enginemanager now change this to https://wowza-server:8090/enginemanager
That should give you a valid certificate. Also login in to the enginemanager. We have to do some extra steps there.
Go to Server > Virtual Host Setup and click Edit
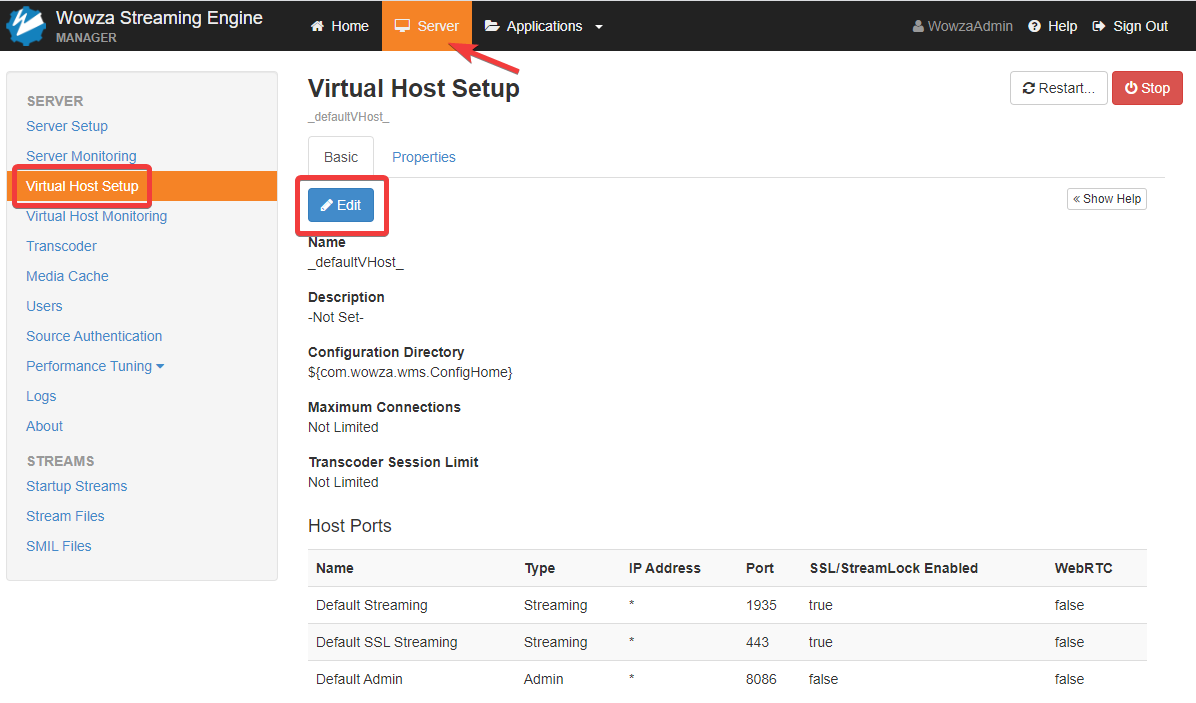
Fig.
If you don’t see port 443 as a Host Port, create it and fill in the fields . Here you have to set the location of the SSL jks file and the password. Change SUB.DOMAIN.EXT to your domainname.

Click Apply to save settings
At this point we are done. To be sure restart wowza or your complete server.
Encoder configuration
Normally via Adobe Media Live or OBS you can stream via RTMP (which is not over ssl). So make sure to stream the http port (1935 by default is http)
If you want to use another port then 1935 add it as an host port and make sure to add the port also to your Firewall (inbound)
Playback url’s
Before:
http://SUB.DOMAIN.EXT:1935/vod/mp4:sample.mp4/playlist.m3u8
In this case i also enabled SSL for port 1935, so these are my new url’s i can use:
#SSL over the default port (443)
https://SUB.DOMAIN.EXT/vod/mp4:sample.mp4/playlist.m3u8
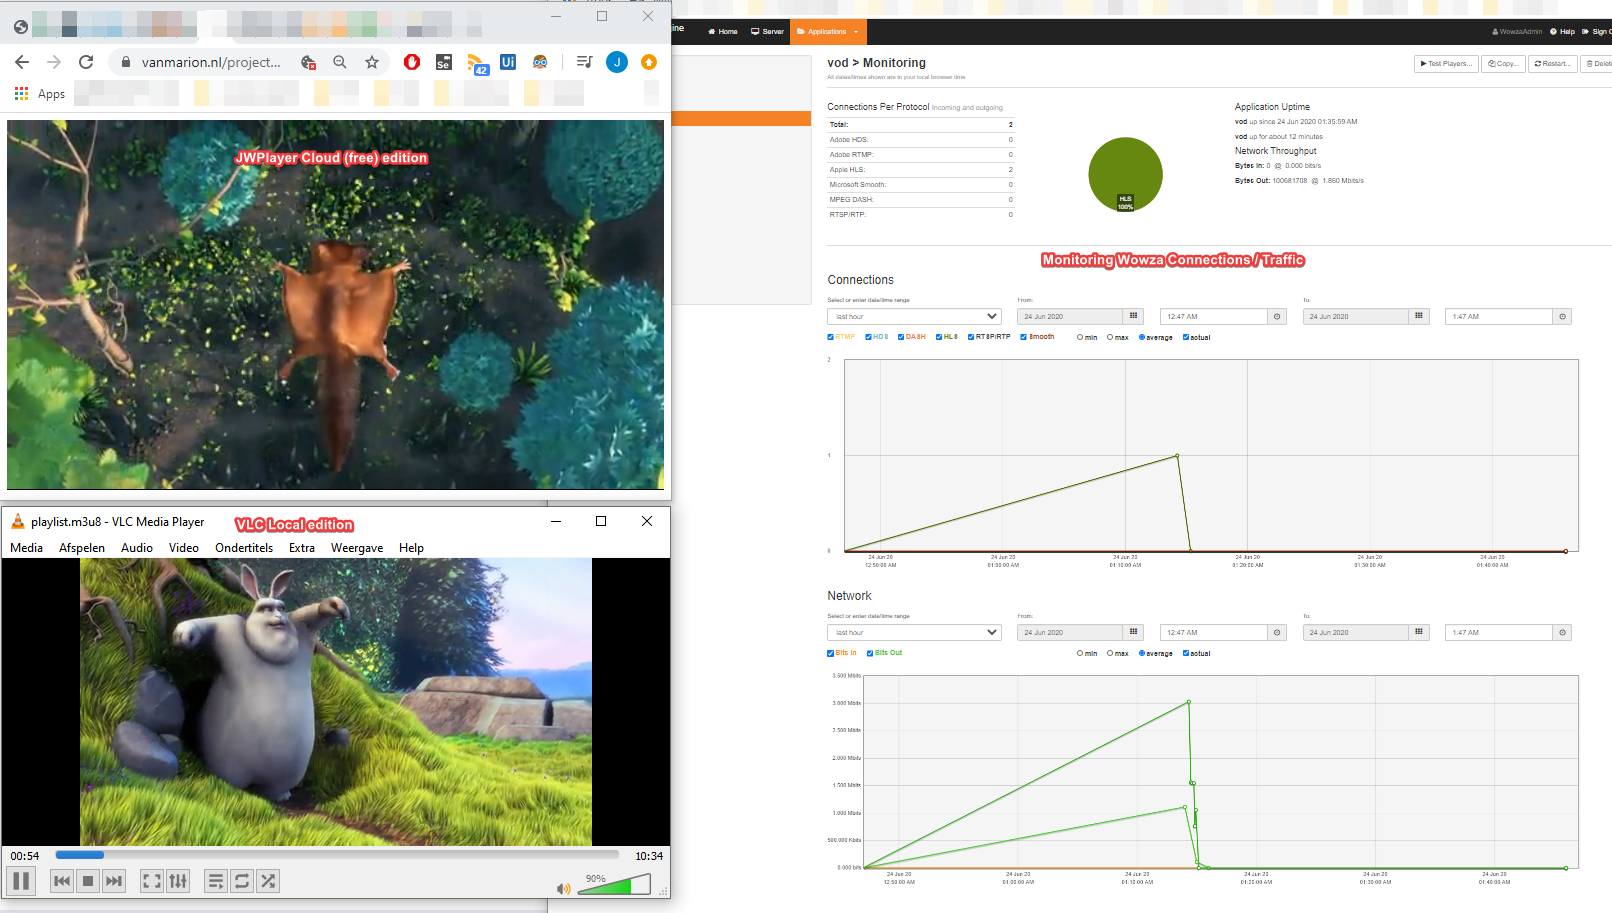
Screenshot example.
I make use of a free edition of JWPlayer. I added the livestream url (https) in the player and run the player via a javascript on my website.
The second stream is the https stream in vlc.
Click on the image for a larger view
Please feel free to give it a try. If you have any questions, just leave a comment.
If it doesn’t work for you, try to give as much detail as possible. (It doesn’t work isn’t enough).


While creating the cert I’m being told that it can’t bind to port 80. Would I have to stop any Wowza services while doing this?
Hi,
you don’t have to stop wowza services, but did you open port 80 in your firewall? Otherwise letsencrypt can’t verify.
I’d say 80 is forwarded. Check it out: 96.56.138.34
When i check your ip, port 80 is closed. Port 443 and 1935 are open. Did you add port 80 to your firewall on your server? Forwarding is nog enough, that will only route port 80 to your server, but your server still blocks it.
edit: or do you have something else running on port 80? That could also give you that notice
update: problems were solved by Email.
Is it necessary to recreate the JKS file after every letsencrypt renewal?
Hi, didn’t this comment until now. If the domainname hasn’t changed recreating the file is not necessary
can you pls check they have update the letsencrypt, I am getting these error dear,
[root@server222 letsencrypt]# sudo -H ./letsencrypt-auto certonly –standalone -d server222.host222.com
Skipping bootstrap because certbot-auto is deprecated on this system.
Your system is not supported by certbot-auto anymore.
Certbot cannot be installed.
Please visit https://certbot.eff.org/ to check for other alternatives.
[root@server222 letsencrypt]#
Hi Melly,
sorry i didn’t see your comment earlier. The installer indeed changed. You can check my github page for ubuntu and CentOS intallers. When i have some spare time i will update my site
https://github.com/nlmaca/Wowza_Installers/blob/master/Ubuntu/Ubuntu_SSL.md
Robert Elek (robymus) recomended use v0.2
What do you think about?
Hi Robert,
i haven’t updated the page in a while and i see indeed that 0.1 is no longer available anymore. Will see if i can write an update soon. Thx for the comment about this. The reason i didn’t use v0.2 was because i didn’t use acme.sh to create an SSL, so i didn’t needed it.
Thank you for this tutorial. I have an old Wowza perpetual license and used their streamlock server for the ssl cert. But my cert expired (my fault for ignoring emails) and Wowza was not interested in helping me because I’m not paying them.
Anyway, your tutorial and github page saved the day. You can check out our live stream on https://surfoff.com/webcam/
Hi Mikey,
Thx for the feedback and nice to hear it worked for you. Have fun streaming again!
Thanks for documenting this, really helpful.
I needed to install Certbot using their snapd guide as the auto install didn’t work. I also had to register the Wowza java install using update-alternatives
Hi G B,
You’re welcome. Thanks for the feedback. I don’t really maintain the 18.04 installation anymore. I moved to 20.04. If you need more info you can also check my Github repository if you are looking for installers or upgrades on Wowza. Scripts are easier to maintain then a website page;). https://github.com/nlmaca/Wowza_Installers.
I think the 18.04 page is being redirected on lot of other pages, so i will see if can do a complete upgrade on the page.
I have ubuntu 20.10 and wowza 4.8.12 installed. but this method did not work for me. any help?
Hi can you help me installed wowza on pc, when you installed icecast it stops working how do I get it to work on ubuntu 20 icecast and wowza
Hi, i think it is best to run wowza and icecast on separate servers. Wowza can be high on CPU and RAM. I have never tried running them all on the same machine. I don’t have a write up for an icecast installation.
If you want to run a basic test a Linux server with 2 vcores and 4GB RAM is plenty for Wowza. Icecast should run easy on a 1vcore CPU and 1GB or RAM.
With the wowza icecast2 plugin build in you can stream from wowza to icecast (AAC stream), so mp3 is not supported from Wowza. Please be aware of that. I don’t know if i can find the time to do a complete example setup like that. Maybe in the future.
Hello, I’ve been following your tutorials for a long time.
And I would like to thank you for everything, your work helps me to this day.
I wanted to ask you for some help, my Wowza Media Server on Ubuntu Server has an expired certificate and I can’t renew it, when I run the command to convert the certificate, using the command that calls java in the LIB folder. It gives a key error and cannot copy the certificate files that were renewed.
My Wowza I changed port 80 and 443.
Would you help me ?
Hi Alencar,
Which version of OS, Wowza are you running? So i might can setup a testcase. I haven’t checked the installation or update of my blog in a while. Sorry for that.