Wowza 4.8.x – Ubuntu 20.04 LTS – Letsencrypt

Update june 19, 2023: I have created an update series for Letsencrypt. Please follow the new tutorial.
https://vanmarion.nl/blog/blog/letsencrypt-ssl-for-wowza-frontend-backend/
I had many questions in my previous topic about the ssl configuration in Ubuntu or CentOS. So i decided to update this, create new installers and see if the configuration of SSL has changed. And indeed it had. I prefer Ubuntu myself, but i use CentOS as well. It’s up to you which OS you want to use.
This second post will be the configuration of LetsEncrypt on Ubuntu 18.04 LTS
See this page: Wowza 4.8.x CentOS 7 Letsencrypt for the CentOS version
Feel free to place a comment (comments will be approved first, to avoid spam).
If you need a clean install of Wowza Streaming Engine on Ubuntu 18.04 LTS then checkout the installer scripts: https://github.com/nlmaca/Wowza_Installers which i have created Those includes Firewall (CSF), Java 11 and Wowza installation. All you need is a valid license key or developer key.
The procedure for 20.04 is almost the same except for the creation of the SSL certificate. Everything else is the same as on a Ubuntu 18.04 installation. I still decided to create a new post for this, just in case if specific OS problems occur.
Requirements
- Ubuntu 20.04 LTS server installed
- Wowza 4.8.x installed
- Firewall open ports: 8088, 8090, 443, 80, 1935
- a domainname pointing to your wowza server (we need this for SSL activation)
What will i show you:
- Installation of letsencrypt on Ubuntu Server
- SSL converter to JKS file
- configuration of frontend (playback) and backend (enginemanager) over SSL
- Testing of playback url’s (vlc, jwplayer)
Keep in mind:
- Your server might have an increase of virtual memory because of the ssl encryption in your stream(s).
- Always test this in your test environment. Don’t keep me responsible for it. This is a guide as is.
Start of installation
Open an ssh connection to your Server and run scripts as root
Note: Certbot-auto will not be supported on Ubuntu 20.04 so this command has slightly changed comparing to 18.04
# update your server
apt update && apt upgrade -y
apt install git
apt install certbot

# clone the certbot repository and configure certbot
git clone https://github.com/certbot/certbot /opt/letsencrypt
cd /opt/letsencrypt

# create an SSL certificate. change SUB.DOMAIN.EXT to the domain that points to your server
certbot certonly --standalone -d SUB.DOMAIN.EXT --key-type rsa

# Some questions will be asked. Fill them in accordingly
# Answer some of the questions:
```
enter email: set-your-email
agree TOS(Terms of Service): A
Share your email: (up to you): N
Set 2 cronjobs so the ssl certificate will be updated automaticly
# crontab -e
@weekly root cd /opt/letsencrypt && git pull >> /var/log/letsencrypt/letsencrypt-auto-update.log
@monthly root /opt/letsencrypt/ certbot certonly --quiet --standalone --renew-by-default -d SUB.DOMAIN.EXT >> /var/log/letsencrypt/letsencrypt-auto-update.log
Wowza needs an JKS file. So we need to convert our just created ssl certificate to a JKS file. On the github page of robymus you can find the script. We will use version 0.2
# Go to the wowza directory
cd /usr/local/WowzaStreamingEngine/lib

# Download the jar file in the lib directory
wget https://github.com/robymus/wowza-letsencrypt-converter/releases/download/v0.2/wowza-letsencrypt-converter-0.2.jar

# Create a jks file
java -jar wowza-letsencrypt-converter-0.2.jar -v /usr/local/WowzaStreamingEngine/conf/ /etc/letsencrypt/live/

# This file will be created in the /usr/local/WowzaStreamingEngine/conf/ directory (jksmap.txt and the jks file).
We now need the contents of the jksmap.txt (copy them to a temporary notepad).
cat /usr/local/WowzaStreamingEngine/conf/jksmap.txt

# This will show you something like this: SUB.DOMAIN.EXT={"keyStorePath":"/usr/local/WowzaStreamingEngine/conf/SUB.DOMAIN.EXT.jks", "keyStorePassword":"secret", "keyStoreType":"JKS"}
Now we need to enable 443 in the VHost.xml file
cd /usr/local/WowzaStreamingEngine/conf

vi VHost.xml
You will see that the 443 is in comment tags <!– and –> at the end of the HostPort. Remove those tags. Second is that we have to change the KeyStorePath and KeyStorePassword in this part
Before:
<SSLConfig>
    <KeyStorePath>${com.wowza.wms.context.VHostConfigHome}/conf/keystore.jks</KeyStorePath>
    <KeyStorePassword>[password]</KeyStorePassword>
    <KeyStoreType>JKS</KeyStoreType>
    <DomainToKeyStoreMapPath></DomainToKeyStoreMapPath>
    <SSLProtocol>TLS</SSLProtocol>
    <Algorithm>SunX509</Algorithm>
    <CipherSuites></CipherSuites>
    <Protocols></Protocols>
    <AllowHttp2>false</AllowHttp2>
</SSLConfig>
And after we have changed the settings. Also make sure to change SUB.DOMAIN.EXT to your own domainname.
<SSLConfig>
    <KeyStorePath>${com.wowza.wms.context.VHostConfigHome}/conf/SUB.DOMAIN.EXT.jks</KeyStorePath>
    <KeyStorePassword>secret</KeyStorePassword>
    <KeyStoreType>JKS</KeyStoreType>
    <DomainToKeyStoreMapPath></DomainToKeyStoreMapPath>
    <SSLProtocol>TLS</SSLProtocol>
    <Algorithm>SunX509</Algorithm>
    <CipherSuites></CipherSuites>
    <Protocols></Protocols>
    <AllowHttp2>false</AllowHttp2>
</SSLConfig>
Save the file after you have made the changes.
The last thing before restarting is to change the tomcat properties
vi /usr/local/WowzaStreamingEngine/manager/conf/tomcat.properties

#Change the default values

#httpsPort=8090
#httpsKeyStore=conf/certificate.jks
#httpsKeyStorePassword=[password]
#httpsKeyAlias=[key-alias]

# TO:

httpsPort=8090
httpsKeyStore=/usr/local/WowzaStreamingEngine/conf/SUB.DOMAIN.EXT.jks
httpsKeyStorePassword=secret
#httpsKeyAlias=[key-alias]
Now we will restart Wowza
systemctl restart WowzaStreamingEngineManager
systemctl restart WowzaStreamingEngine
The configuration is almost done.
Open your browser and instead of using the http://wowza-server:8088/enginemanager now change this to https://wowza-server:8090/enginemanager
That should give you a valid certificate. Also login in to the enginemanager. We have to do some extra steps there.
Go to Server > Virtual Host Setup and click Edit
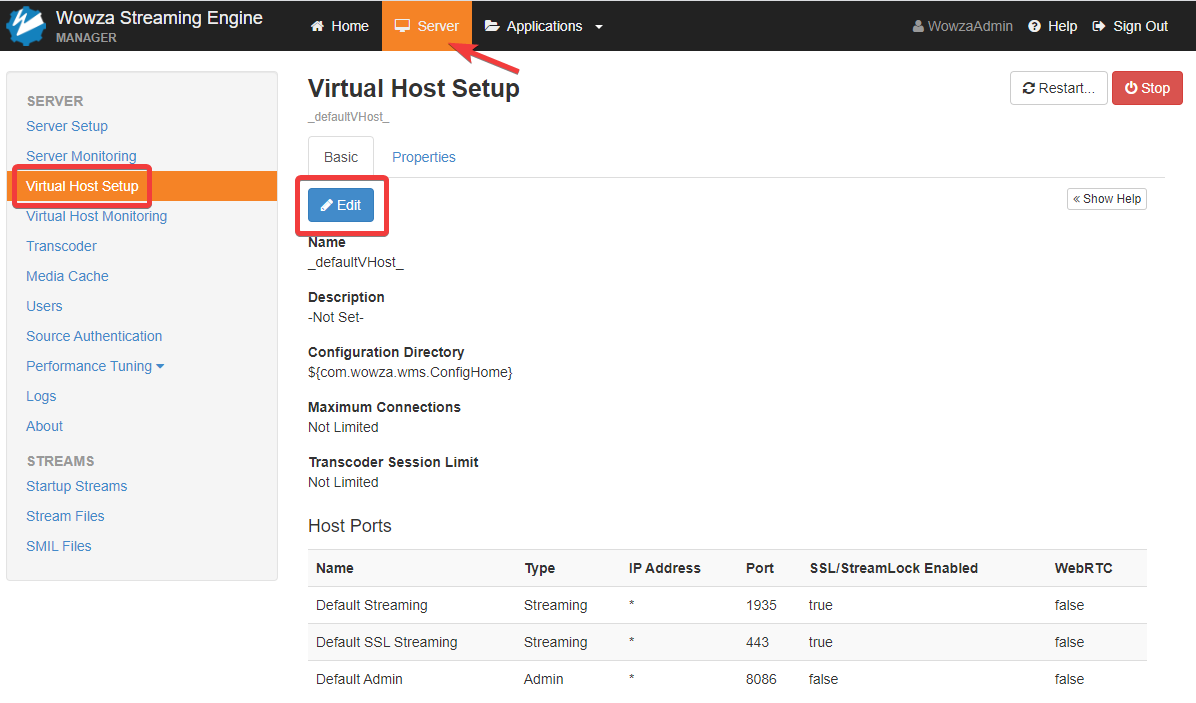
Fig.
If you don’t see port 443 as a Host Port, create it and fill in the fields . Here you have to set the location of the SSL jks file and the password. Change SUB.DOMAIN.EXT to your domainname.

Click Apply to save settings
At this point we are done. To be sure restart wowza or your complete server.
Encoder configuration
Normally via Adobe Media Live or OBS you can stream via RTMP (which is not over ssl). So make sure to stream the http port (1935 by default is http)
If you want to use another port then 1935 add it as an host port and make sure to add the port also to your Firewall (inbound)
Playback url’s
Before:
http://SUB.DOMAIN.EXT:1935/vod/mp4:sample.mp4/playlist.m3u8
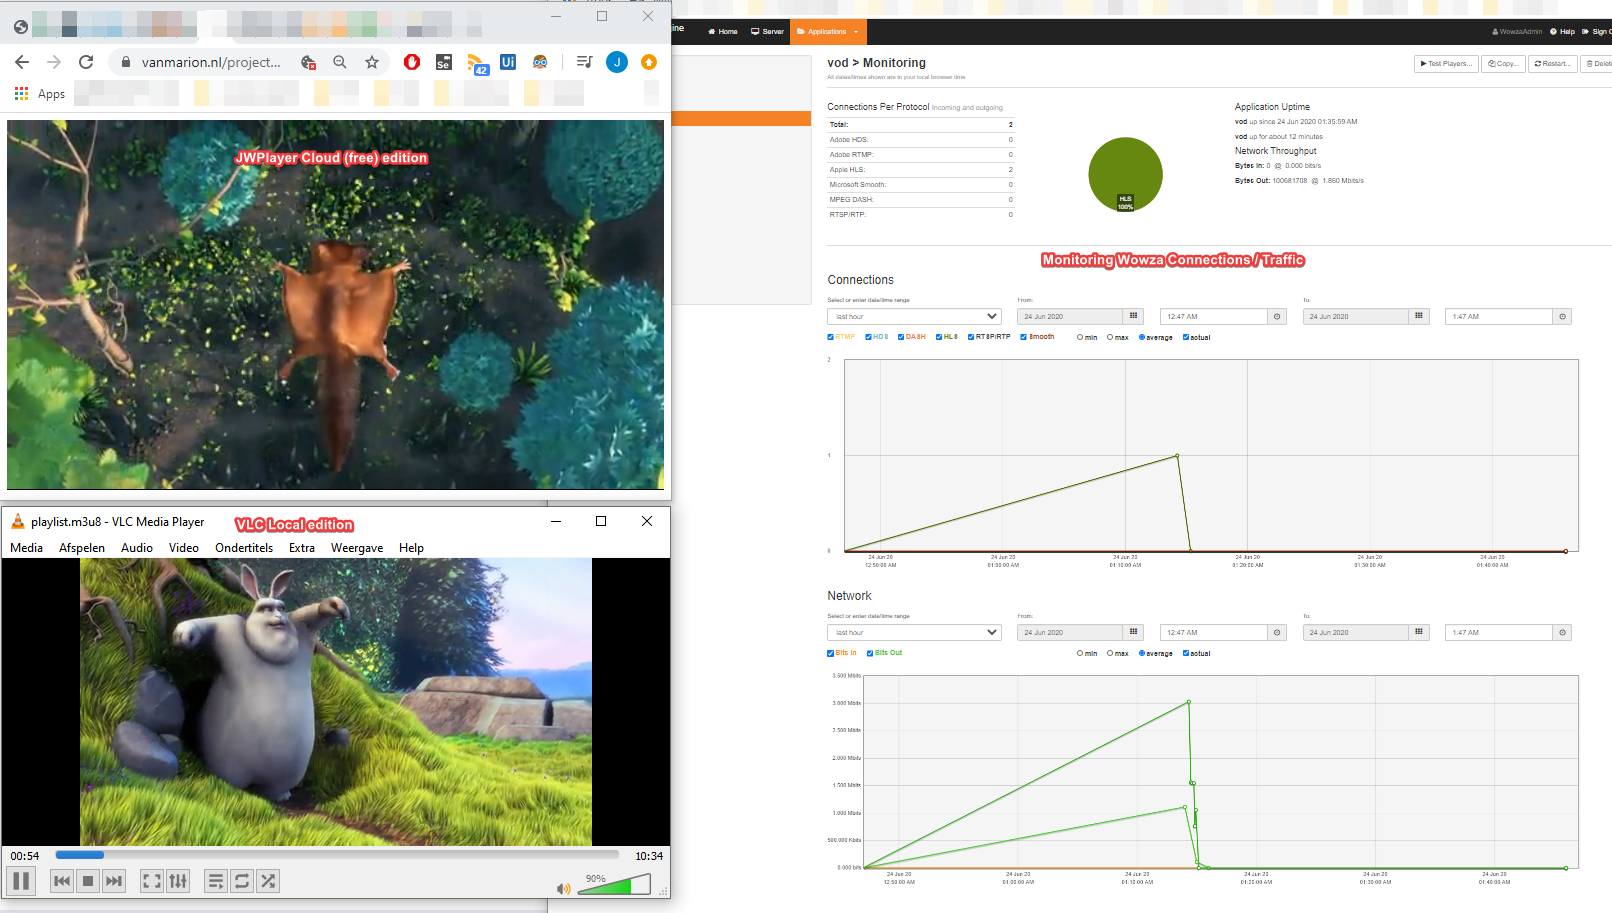
In this case i also enabled SSL for port 1935, so these are my new url’s i can use:
#SSL over the default port (443)
https://SUB.DOMAIN.EXT/vod/mp4:sample.mp4/playlist.m3u8
Screenshot example.
I make use of a free edition of JWPlayer. I added the livestream url (https) in the player and run the player via a javascript on my website.
The second stream is the https stream in vlc.
Click on the image for a larger view
Please feel free to give it a try. If you have any questions, just leave a comment.
Troubleshooting
The ssl certificate can’t authenticate on port 80 ?
First check if the ports are open on your server:
lsof -i -P -n | grep LISTEN

# it should return the open ports on your server.
sshd        2028            root    3u  IPv4  28753      0t0  TCP *:22 (LISTEN)
sshd        2028            root    4u  IPv6  28764      0t0  TCP *:22 (LISTEN)
systemd-r   4703 systemd-resolve   13u  IPv4  37166      0t0  TCP 127.0.0.53:53 (LISTEN)
java      658615            root   57u  IPv4 434159      0t0  TCP *:8088 (LISTEN)
java      658615            root   62u  IPv4 434163      0t0  TCP *:8090 (LISTEN)
java      658737            root   10u  IPv4 434357      0t0  TCP *:35501 (LISTEN)
java      658737            root  108u  IPv4 435335      0t0  TCP *:8087 (LISTEN)
java      658737            root  117u  IPv4 434496      0t0  TCP *:8083 (LISTEN)
java      658737            root  120u  IPv4 434511      0t0  TCP *:1935 (LISTEN)
java      658737            root  124u  IPv4 434515      0t0  TCP *:443 (LISTEN)
java      658737            root  128u  IPv4 434519      0t0  TCP *:8086 (LISTEN)
If it doesn’t show port 80,443,8090, 1935 you have to check your firewall to open these ports.
Questions
Of course i’m willing to help, but i need information for that. Which steps did you do, what is the error you get, Then feel free to leave a comment.
If the installation works for you i would also like to hear.


I have ubuntu 20.10 and wowza 4.8.12 installed. but this method did not work for me. any help?
Hi Ana,
Can you give me a bit more detail where you have problems. Which steps don’t work?. I will see if i can run a test setup. I thought 20.10 didn;t exist, but it did haha. But i see 2010 is already EOL as of july 2021, so i advise you to upgrade. I only run LTS versions.
Did you also patch your wowza version because of the Log4j exploids?. Make sure to do that. Please check my github page for more info on that.
https://github.com/nlmaca/Wowza_Installers
Already replied here: https://vanmarion.nl/blog/blog/wowza-4-8-x-ubuntu-20-04-lts-letsencrypt/
java -jar wowza-letsencrypt-converter-0.2.jar -v /usr/local/WowzaStreamingEngine/conf/ /etc/letsencrypt/live/ is is not working in my machine while i have install javaVoluptate perferendi.
[…] Written with inspiration from the original post on thia topic targetting Ubuntu at maca’s blog. […]
Hi,
I think many users will find it usefull. Thx for the link and referral. Highly appreciated!
STEP: # Create a jks file
Read error in initialization:/etc/letsencrypt/live
Error reading certificates, aborting without writing anything
Hi,
Can you check if the file wowza-letsencrypt-converter-0.2.jar is present in your /usr/local/WowzaStreamingEngine/lib directory?
“We now need the contents of the jksmap.txt (copy them to a temporary notepad).”
Hi,
you need the contents of the file for the next step in the VHost.xml
Change the KeyStorePath, KeyStorePassword and KeyStoreType to the values you see in the txt file.
In wowza this is the same:
${com.wowza.wms.context.VHostConfigHome} == /usr/local/WowzaStreamingEngine
I hope this explains it a bit better.